Plan your brisket needs in one place: estimate how much to buy, generate a start-to-serve timeline, and adjust target temps for altitude.
Everything you need to plan a beef brisket cook is here. Size your purchase, generate a start-to-serve timeline, and, if you’re at elevation, adjust targets for steady results. These tools apply realistic yields and a small buffer so portions stay generous and dinner starts on time.
Start with the right brisket tool
This page has three brisket tools. Use the one that matches the problem you are trying to solve first.
- How much brisket to buy: Set guests and portions to estimate purchase weight.
- Plan my brisket cook: Get a start time and printable timeline.
- Cooking at altitude: Adjust targets based on elevation.
Tip: Plan a 2–4 hour brisket hold time so you’re not rushing when it is time to slice.
How much brisket per person should I buy?
Plan ⅓–½ lb cooked brisket per person for most meals. Enter guests and serving size; the calculator converts that to raw pounds to buy based on your expected yield. Planning a crowd? This brisket yield calculator answers “brisket per person for 20” but scales for any headcount.
Want the chart version first? See our guide to how much brisket per person, with cooked serving amounts and raw whole-brisket estimates for 5 to 50 guests.
How Much Brisket to Buy (Quick Calculator)
How Much Brisket Calculator
Calculate portions and purchase weight for your crowd.
Typical Brisket Sizes:
- Whole packer: 10-18 lbs (most common: 12-16 lbs)
- Large packer: 18-22 lbs (less common)
- Flat only: 5-10 lbs
- Whole packer: 4.5-8 kg (most common: 5.5-7 kg)
- Large packer: 8-10 kg (less common)
- Flat only: 2-4.5 kg
About These Estimates
How We Calculate Purchase Weight
We work backward from your desired cooked portions:
- Calculate total cooked weight needed (guests × portion per guest)
- Apply your expected yield % to determine raw weight
- We show a 45-57% yield range as typical. The USDA Food Buying Guide (Section 1: Meats/Meat Alternates) reports ~46% purchase-to-plate yield for brisket, which falls within and validates our observed range for BBQ-style low-and-slow methods.
Why Yield Varies
- Heavy trimming + no wrap: closer to 45% yield (less retained fat and more evaporative loss; baseline yields reference: Virginia Tech study, PDF)
- Standard prep + butcher paper: ~50% (balanced moisture retention)
- Light trimming + foil wrap: closer to 57% (tighter wrapping reduces evaporation and speeds heat-up)
- Most cooks see 50-55% with standard prep, which tracks well with the USDA's ~46% figure
Note: Separate from purchase-to-plate yield, cooked-meat yield for brisket (after trimming) commonly falls in the mid-60% range. Reference values: ~69% average with a range (~65-76%) for brisket flat, braised (USDA ARS cooking yields, PDF).
💡 Our estimates lean slightly conservative. It's better to have leftover brisket (which never goes to waste!) than to run short at serving time.
Accuracy notes
- Yields vary with trim level, grade, and whether you serve more flat or point. Typical trimmed-to-plate ranges are about 45–57 percent; use the yield slider to match your style.
- Serving style changes portions. Sandwiches or heavy sides often need less meat; meat-centric plates or big appetites may need more.
- The leftovers toggle is a planning buffer. Add it if you want seconds or next-day meals.
See “About these estimates” for methods and sources.
More BBQ planning tools
Need help with another part of the cook? Our BBQ Tools & Calculators page has tools for planning portions, timing cooks, choosing wood, seasoning by weight, and serving barbecue without running short.
Quick Gear Picks
- Leave-in probe thermometer: Monitor pit and meat temps during the cook and the hold without lifting the lid.
- Instant-read thermometer: Verify doneness and slice timing; check for probe-tender feel.
- Pink butcher paper (24"): Breathes and preserves bark when wrapping.
- Heavy-duty foil (18"): Speeds the stall and softens bark when you need to push through.
- Curved boning/trimming knife: Safer, controlled fat trimming; aim for a ~¼-inch cap on the flat.
- Insulated cooler/Cambro: Holds a 1–4 hour rest safely above 140°F with towels.
- Heat-safe gloves (nitrile + cotton liners): Grip hot wrapped brisket and trays with confidence.
- Optional: Meat injector: If you inject, it helps distribute broth evenly without pockets.
Links may earn us a commission at no cost to you. We recommend gear we trust. As an Amazon Associate, I earn from qualifying purchases.
When should I start my brisket?
Work backward from your serve time: at 250°F a whole packer typically needs about 1 to 1½ hours per pound plus 1 to 2 hours to rest. Use this brisket start time calculator to work out exactly when to put brisket on. Set your serve time, pit temp, and rest window to generate a start-to-serve timeline.
- Plan by serve time or start time (we'll compute when to put brisket on)
- Works for packer, flat, or point cuts
- Accounts for wrap method, stall, and rest time
- Calculates servings and portion sizes
- Printable timeline for your cook day
For a general estimate instead, see brisket times by weight at 225, 250, and 275.
How to Use the Planner
- Choose your planning method: Plan by serve time (when you want to eat) or start time (when you want to begin smoking).
- Enter brisket details: Weight, cut (packer, flat, or point), pit temperature, and wrap method.
- Set your timing: Enter your target serve date and time.
- Get your timeline: The calculator provides a complete schedule including when to light your fire, wrap, check temps, and rest.
- Print or save: Take your timeline to the smoker with you.
New to this? You'll appreciate our full brisket guide. Vet? There's something new for you, too.
Brisket Cook Time Planner (Start-to-Finish Calculator)
Brisket Cook Time Calculator
Plan your complete smoking timeline from prep to plate.
Plan your cook
Pick your serve time; we'll calculate when to start cooking.
Cook Summary
Timeline
All times in Eastern Time
Fill in your details and generate a plan to see your cook schedule.
Yield & servings
About These Estimates
How We Calculate Your Timeline
Our planner combines field-tested BBQ heuristics with meat-science fundamentals and federal safety guidance. Minutes-per-pound is a planning estimate, not a doneness test (see principles from Texas A&M Meat Science). Higher pit temperatures shorten time per pound, consistent with general roasting references (USDA/FoodSafety.gov roasting charts).
Cook Rate by Temperature
Wrap Method Effects
Wrapping reduces evaporative cooling and speeds heat transfer (mechanism support: Virginia Tech study, PDF). Paper is more breathable than foil, so the speed-up is smaller (permeability context: USDA Forest Service, PDF):
Cut Type Adjustments
Yield Factors
Expected cooked-meat yield (after trimming) varies by wrap method. These sit within typical ranges reported for brisket (e.g., flat, braised ~69% average, ~65-76% range; USDA ARS cooking yields, PDF):
Note: Overall purchase-to-plate yield ranges 45-57% depending on trimming and wrap method.
A Note on Thickness
Thickness affects cook time more than total weight because heat penetration scales with thickness, not mass (heat equation (thickness scaling)). If your brisket is unusually thick or thin, adjust expectations accordingly.
Doneness and Safety
Always probe for tenderness (often 195-205°F for brisket) rather than relying only on time. Use a reliable thermometer and follow federal guidance for safe internal temperatures (FoodSafety.gov).
Learn More
These estimates include a modest safety buffer to ensure you're not rushed. Your brisket may finish 1-2 hours early—that's normal and better than running late.
Accuracy notes
- Cook time is an estimate. Pit stability, brisket thickness, and wrap choice change the stall and total time.
- Cook to tenderness, not a clock. Use a probe thermometer to confirm that the flat is tender before you stop the cook.
- Plan a 1–2 hour hot-hold buffer so early or late finishes do not affect serve time. Keep the brisket safely above 140°F during the hold.
See “About these estimates” for methods and sources.
Do I need to adjust brisket temps for altitude?
Yes, high altitude brisket requires some adjustment. Higher elevation lowers the boiling point, so wrap and finish targets need to be nudged a few degrees; enter your altitude and the adjuster calculates altitude-aware temps for consistent tenderness.
Altitude Adjustments for Brisket (Automatic Calculator)
Altitude Adjustment Calculator
Adjust target temperatures for your elevation.
About Altitude Adjustments
Why Altitude Matters
At higher elevations, atmospheric pressure drops and water boils at a lower temperature, which reduces the effective temperature of simmering and moist-heat cooks (CSU Extension).
The Science
- Water boils at 212°F at sea level
- Boiling point drops about 1°F per 500 ft of elevation gain (CSU Extension; corroborated in NMSU Extension, PDF)
- At Denver (5,280 ft), practical boiling sits around ~201-203°F (CSU Extension)
- Tenderization depends on collagen transitions that occur across roughly 140-176°F (60-80°C) with time and moisture, so lower boiling points slow that conversion (NCSU thesis; WSU research)
Our Calculation Method
We adjust your target temperatures using a conservative rule of thumb: we apply ~70% of the local boiling-point reduction. This preserves a safety margin, aligns with high-altitude practice, and reflects the physics documented above on boiling point and collagen behavior (boiling-point data: CSU Extension).
Additional High-Altitude Tips
- Moisture evaporates faster; consider a water pan in the smoker
- Wrap earlier to limit evaporative cooling
- Plan ~15-25% longer cook times for simmered/braised meats at altitude (CSU Extension)
- Fuel use increases; keep extra on hand
Learn More
Accuracy notes
- Higher elevation lowers the boiling point of water, which slows collagen conversion and can lengthen the stall.
- You may need a slightly higher pit temperature or an earlier wrap to keep rendering on track. Always verify tenderness before you finish.
- Humidity, wind, and cooker design also affect results. Use these adjustments as guidance, then dial in for your pit.
See “About these estimates” for methods and sources.
How to Slice Your Brisket
After 12, 18, or even 24 hours of smoking, don't let the last two minutes ruin your masterpiece. The single most important rule for a tender, juicy brisket is to slice against the grain.
What does that mean? A brisket is a muscle made of long, parallel fibers.
- Slicing with the grain leaves those long, tough fibers intact, resulting in a chewy, stringy bite.
- Slicing against the grain (perpendicular to it) severs those fibers into tiny, short pieces, creating the "fall-apart" tenderness you've worked so hard for.
The 3-Step Slicing Guide
The trick is that a whole packer brisket is two different muscles—the "flat" and the "point"—and their grains run in different directions.
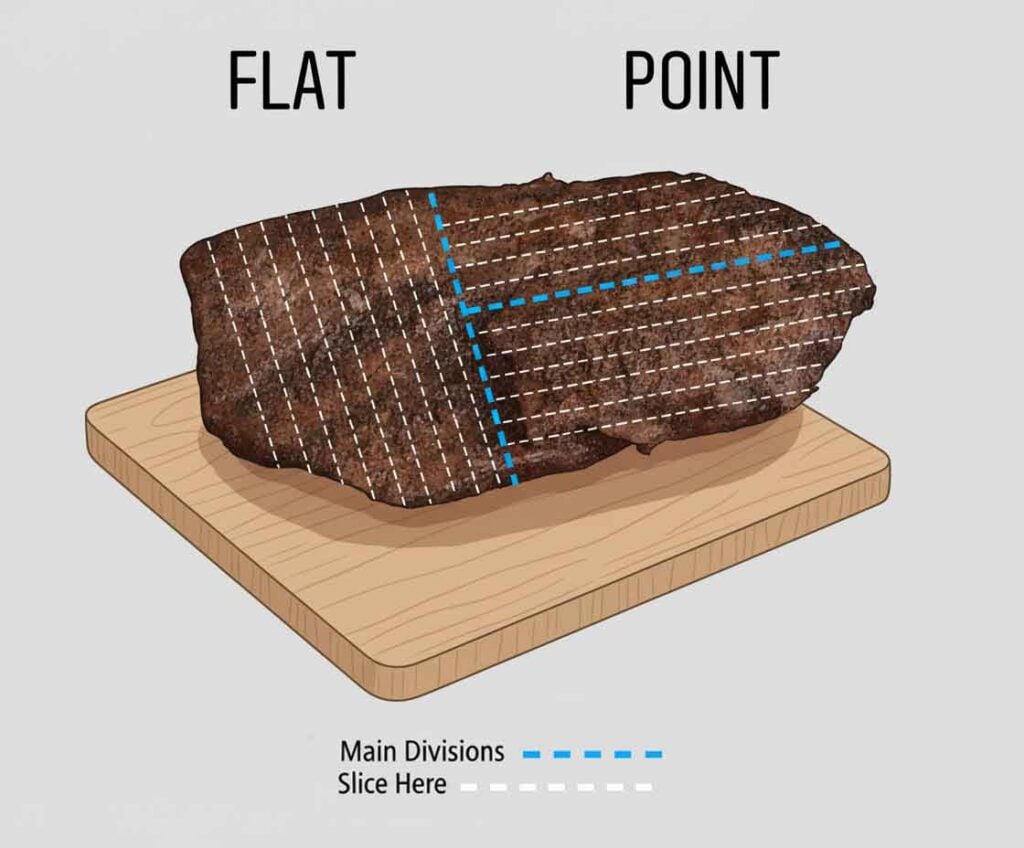

- Identify & Separate: Look for the thick, fatty seam of tissue that separates the leaner, thinner "flat" from the thicker, fattier "point" that sits on top. The easiest way to slice is to separate these two muscles first. Slide your knife right along that fat seam to divide the brisket into two manageable pieces.
- Slice the Flat: Look at the flat. You will clearly see the muscle fibers (the "grain") running in one long direction. Position your knife 90 degrees (perpendicular) to that grain and slice the entire flat into pencil-thick slices (about ¼ inch).
- Slice the Point: The point's grain runs in a different direction (often nearly 90 degrees different from the flat). Rotate the point, identify its new grain direction, and slice against it as well. (Alternatively, you can cut the point into 1-inch cubes to make amazing burnt ends).
The Right Tool for the Job
A standard 8-inch chef's knife is too short. It will force you to "saw" back and forth, which tears the meat and ruins your beautiful bark. A bread knife will shred the surface.
To get those clean, full-width, professional-looking slices that glide through the meat in one smooth stroke, you will want a long, sharp 12 to 14-inch brisket slicing knife.
Our Go-To Slicer: 12-Inch Granton Edge Slicing Knife
A long, non-serrated blade is the best way to get perfect, clean-cut slices without tearing your hard-earned bark. (This link is an affiliate link, which means we may earn a commission at no cost to you. We only recommend gear we trust.)
How to Store and Reheat Leftover Brisket
Leftover brisket is one of the best parts of a long cook. But cold, dry brisket is a tragedy. The key to great leftovers is twofold: store it correctly and reheat it gently.
Storing Your Leftovers
The #1 rule of storage: Do not slice it all. A whole, unsliced chunk of brisket will retain exponentially more moisture than individual slices.
- In the Refrigerator (Up to 4 days):
- Let the brisket cool down slightly (but don't leave it in the "danger zone" between 40°F and 140°F for more than 2 hours).
- Wrap large, unsliced chunks tightly in plastic wrap or, even better, vacuum seal them.
- Store any jus or drippings in a separate, airtight container. This liquid is gold for reheating.
- In the Freezer (Up to 6 months):
- Vacuum sealing is not optional here. It is the only way to prevent freezer burn and protect your 18-hour investment.
- Portion the brisket into meal-sized chunks, vacuum seal them individually, and freeze them flat.
The Best Way to Reheat Brisket (Without Drying It Out)
Your goal is to bring the brisket back to temperature without cooking it further. The secret is low, slow, and moist heat.
- Method 1: The Oven "Steam Bath" (Best for Chunks)
- Preheat your oven to a low 300°F (150°C).
- Place the unsliced brisket chunk in a foil pan or baking dish.
- Add a splash of liquid—this is where your saved jus, beef broth, or even a little water comes in.
- Cover the pan tightly with aluminum foil to trap the steam.
- Heat until the center of the meat is warm (about 140°F-150°F). Do not overcook!
- Method 2: Sous Vide (The "Pro" Method)
- If you vacuum-sealed your leftovers, this is the best, most foolproof method.
- Set your sous vide water bath to 150°F (65°C).
- Drop the sealed bag directly into the water and let it heat for 1-2 hours. It's impossible to overcook, and it will be as juicy as it was on day one.
- Method 3: The Pan Simmer (Best for Slices/Tacos)
- For a quick meal like tacos or a sandwich, slice the cold brisket first.
- Place the slices in a hot skillet with a generous amount of jus or beef broth.
- Let the meat simmer gently in the liquid for just a couple of minutes until it's heated through.
How Long Does It Take to Smoke a Brisket?
Brisket cooking time depends on several factors:
Cook Time Per Pound
A general rule is 1 to 1.5 hours per pound at 225-250°F, but this varies based on:
- Pit temperature: Higher temps (275-300°F) cook faster but may sacrifice some tenderness.
- Wrap method: Wrapping in foil (Texas crutch) speeds up cooking; butcher paper is slower but preserves bark.
- Cut type: Packer briskets (full brisket) take longer than separated flats or points.
- The stall: Between 150-170°F, evaporative cooling can slow cooking for 2-4 hours.
For the why behind stalls, wrapping, and slicing, see our Brisket guide.
Typical Brisket Cook Times
Brisket Cook Times (Approximate)
| Brisket weight | At 225°F | At 250°F | At 275°F |
|---|---|---|---|
| 8–10 lbs | 10–14 hours | 8–12 hours | 6–10 hours |
| 12–14 lbs | 14–18 hours | 12–16 hours | 10–14 hours |
| 16–18 lbs | 18–24 hours | 16–20 hours | 14–18 hours |
Ranges assume steady pit temps; plan an additional 1–2 hours to rest. Use the Planner for an exact start time.
Note: These are estimates. Use a meat thermometer and look for probe tenderness (195-205°F internal temp) rather than relying solely on time.
Brisket Smoking Timeline Tips
Always Plan Extra Time
Briskets can "stall" unpredictably. Build in a 2-4 hour buffer and use a cooler to hold your finished brisket if it's done early.
Don't Skip the Rest
Resting for 1-4 hours in a cooler (wrapped in towels) is crucial for moisture redistribution. Your brisket will actually improve during this time. (See the FAQ on how long to rest brisket.)
Start Earlier Than You Think
It's better to have your brisket finish early and rest longer than to rush the cook. A properly rested brisket can hold safely above 140°F for 4+ hours.
Track Your Cook
Use this calculator before your cook, but also keep notes during. Tracking your actual times helps you dial in future cooks on your specific smoker.
Brisket Planner & Tool FAQs
Our calculator uses proven cook rate algorithms based on pit temperature, weight, and wrap method. However, every smoker and brisket is different. Use this as a planning guide and always cook to temperature (195-205°F) and tenderness, not just time.
Choose Plan by serve time to get an exact start time and a full, printable timeline. Pick Plan by start time if you know when the brisket goes on; the tool estimates your serve window. Set cut, weight, pit temp, wrap choice, and rest. Build in a 2–4 hour buffer to stay relaxed.
Most cooks land between 45–57% purchase-to-plate yield. Use ~50% as a safe default. Go closer to 45% if you trim heavily or skip wrapping; closer to 57% for lighter trims or foil. Add ~10% if you want leftovers. The slider lets you match your style and meat grade.
Plan 2–4 hours of hot-hold time. If you finish early, rest wrapped in a cooler or a warm oven and keep the meat above 140°F for food safety. Longer, gentle holds often improve slices. Use the planner’s rest settings to give yourself a flexible start window.
Wrap choice affects both time and bark. Foil is fastest but softens bark. Butcher paper is a balanced middle ground. No wrap cooks longest and keeps bark firmest. Use the tool’s Wrap and Bark preference settings to align speed and crust with your target serve time.
Yes—select Flat, Point, or Whole packer, then fine-tune with Thickness relative to typical. A noticeably thinner flat tends to cook faster; a short, stocky brisket often needs longer. If your 14-lb packer is much thicker than typical, choose Thicker than typical to avoid cutting timing too tight.
Use the Altitude Adjustment Calculator to set wrap and finish targets for your elevation, then plan your cook with those temps. Higher elevation lowers the boiling point and can lengthen stalls. Always verify doneness by feel with a probe; use the adjusted numbers as guidance rather than absolutes.
Was this information accurate for your pit? Tell us what you’d tweak next time in the comments below.
Sources
- FoodSafety.gov — 4 Steps to Food Safety — danger zone and time limits (2-hour/1-hour rule) referenced in the serving guidance.
- FDA — Serving Safe Buffets — hot-hold guidance (≥140°F) cited in safety notes.
- FoodSafety.gov — Safe Minimum Internal Temperatures — beef roast baseline and rest information for context.
- USDA ARS — Cooking Yields for Meat & Poultry (PDF) — cooked-meat yield reference informing the calculator’s ranges.
- USDA Food Buying Guide — Yield Tables — purchase-to-edible yield context for planning servings.
- Texas A&M Meat Science — Cooking and Smoking Barbecue — pit-temperature norms and time-per-pound guideline context.
- Texas A&M Meat Science — Barbecue Science — evaporative “stall” explanation used in timeline logic.
- Colorado State University Extension — High-Elevation Food Preparation — boiling-point drop (~2°F per 1,000 ft) informing altitude adjustments.
We cite authoritative references and note when testing is based on first-hand experience.
About the author
James Roller is the co-founder and publisher of Destination BBQ and author of Going Whole Hog. Since 2012, he has written about South Carolina barbecue restaurants, recipes, history, and traditions and created practical guides and tools for home cooks.