Use dry brining by weight to choose a sensible salt percentage, avoid over-salting, and get repeatable results from ribs to brisket
Spoon measurements are easy until they are not. A teaspoon of one kosher salt is not the same as a teaspoon of another, and table salt is different again. That may not matter much when you are salting a pot of water, but it matters when you are putting salt directly on meat and letting it sit.
Dry brining works better when you weigh the salt. The catch is knowing when less salt is the better choice. Enhanced meat, injected meat, self-basting turkey, kosher poultry, salty commercial rubs, fish, thin cuts, and ground meat can all push you toward too much salt fast.
Here’s the basic idea: weigh the meat, choose a sensible salt percentage, and turn that percentage into grams before you salt.
If you are still deciding whether dry brining is the right approach for this cook, start with our guide to choosing wet, dry, or equilibrium brining. If you already know you want a dry brine, start with the quick answer below.
Quick answer
- Dry brining by weight means weighing the meat and using salt as a percentage of that weight.
- 1% means 10 grams of salt per 1,000 grams of meat.
- Grams are more reliable than teaspoons because salt brands and crystal sizes vary by volume.
- Check the label before salting. Enhanced, injected, self-basting, kosher, marinated, and pre-seasoned meat may already contain salt.
- Count salty rubs too. If salt is near the top of the ingredient list, do not put a full dry brine underneath without adjusting.
- Use the Brining Calculator for exact grams once you know the meat weight and salt percentage.
- Dry brine under refrigeration at 40°F or below, not on the counter.
What dry brining by weight means
This sounds like a math trick, but it is really just using a scale instead of guessing by spoonfuls.
You weigh the trimmed meat. You choose a salt percentage. Then you weigh that much salt in grams, apply it evenly, and refrigerate the meat before cooking.
The basic process looks like this:
- Weigh the trimmed meat.
- Choose a cautious salt percentage.
- Weigh the salt in grams.
- Apply it evenly over the meat.
- Refrigerate the meat before cooking.
The percentage tells you how much salt to use for the weight of that piece of meat. A chicken breast and a pork butt do not need the same number of grams, but the method is the same: weigh the meat, choose the percentage, weigh the salt.
The part to slow down on is choosing how much salt to use. A pork butt with no added solution can handle a different amount of salt than thin chicken cutlets. A brisket going under a salt-free rub is different from ribs getting a commercial rub that lists salt first.
Use this page to decide where to start. Once you know the percentage, the rest is converting that choice into grams.
Why grams are better than teaspoons
This is where a lot of dry-brine advice gets shaky. Teaspoons measure space. Grams measure weight.
Salt does not pack into a spoon the same way from brand to brand. Fine table salt packs tightly. Morton kosher salt is lighter by volume. Diamond Crystal kosher salt is flakier and lighter still. So if a recipe says “use 1 teaspoon” without naming the exact salt, the actual amount of salt can change a lot.
UC Agriculture and Natural Resources shows those differences in its salt-by-weight guidance:
- Diamond Crystal kosher salt: about 2.8 grams per teaspoon
- Morton kosher salt: about 4.8 grams per teaspoon
- Fine table salt: about 6 grams per teaspoon
That means a teaspoon of table salt can be more than twice as much salt by weight as a teaspoon of Diamond Crystal.
That is not a small difference.
A gram scale removes that problem. Ten grams of salt is ten grams of salt, whether it came from Diamond Crystal, Morton, or a box of table salt. The flakes may look different in the bowl, but the weight is the same.
If you’re still thinking in spoonfuls, look at the difference first.
Salt measurement caution
- Diamond Crystal kosher salt: about 2.8 grams per teaspoon
- Morton kosher salt: about 4.8 grams per teaspoon
- Fine table salt: about 6 grams per teaspoon
- A scale makes the salt amount repeatable across brands and crystal sizes.
- Spoon conversions are only a fallback, not the best way to dry brine by weight.
How dry-brine percentages work
A percentage just compares the salt weight to the meat weight. Once you think of it that way, the idea gets much easier.
If the meat weighs 1,000 grams, then 1% means 10 grams of salt. A 1.5% dry brine means 15 grams. A 2% dry brine means 20 grams.
Those numbers are examples to help you understand the percentage. They are not a rule for every cut.
| Salt percentage | Salt per 1,000 g meat | Where it fits | Watch out for |
|---|---|---|---|
| 1% | 10 grams of salt | A lighter dry brine that often makes sense for smaller cuts, poultry pieces, ribs, fish, or cautious cooks. | This is not automatically right for every piece of meat. |
| 1.5% | 15 grams of salt | A middle range that can fit many whole chickens, turkey pieces, pork loin, chops, and ribs when the meat has no added solution and the rub is not salty. | Use less if the meat is enhanced or the rub is salty. |
| 2% | 20 grams of salt | A stronger dry brine that comes up more often with larger BBQ cuts like pork butt or brisket. | Do not treat 2% as a universal answer. It can be too much for thin cuts, poultry, fish, or salty rubs. |
Use the table to learn the idea, not to choose blindly. Once you know the meat weight and the percentage you want to try, the Brining Calculator can give you the exact grams instead of making you do decimal conversions by hand.
Dry-brine starting ranges by cut
These ranges are starting points, not promises. The right choice still depends on the cut, thickness, label, rub, and how salty you like your barbecue.
When you are unsure, start lower. Give yourself more planning time, not more salt.
| Cut or cook | Starting range | Use the lower end when | Watch out for |
|---|---|---|---|
| Smaller cuts | About 0.75% to 1.25% | Use the lower end for thin steaks, chops, and small pieces of chicken. | Small pieces can get salty faster than you expect. |
| Poultry pieces | About 0.75% to 1.25% | Use less or skip added salt if the package shows added solution. | Raw poultry also has a shorter safe storage window than whole beef or pork cuts. |
| Whole chicken | About 1% to 1.5% | Use less for enhanced or kosher chicken. | An uncovered refrigerated rest can help the skin dry, but it still needs to stay safely refrigerated. |
| Turkey | About 1% to 1.5% | Use less or skip added salt for self-basting or enhanced birds. | Many supermarket turkeys already contain a salt solution. Read the label before salting. |
| Pork loin and chops | About 1% to 1.5% | Use the lower end for lean, thin, or smaller pieces. | Lean pork can taste too salty if you treat it like a large BBQ roast. |
| Pork butt | About 1.5% to 2% | Use less if your rub brings a lot of salt. | A full dry brine plus a full salty rub can be too much. |
| Brisket | About 1.5% to 2% | Use less if the rub is salty or the brisket has been injected. | Weight matters, but thickness and rub choice matter too. |
| Ribs | About 1% to 1.5% | Use the lower end if you plan to use a commercial rub. | Ribs are thinner than pork butt or brisket and often get salty seasoning on top. |
| Fish | About 0.5% to 1% | Stay low and keep the rest short. | Fish can turn firm or cured-tasting quickly. |
| Barbecue with a salty rub | Often reduced salt or no separate dry brine | Use the rub as the salt source if salt is near the top of the ingredient list. | The rub label matters more than a universal percentage. |
Do not treat those ranges as final answers. They are starting points to help you choose a sensible percentage before you weigh the salt.
When dry brining helps
Dry brining helps most when the meat has time to absorb the salt and the surface has time to dry.
Salt seasons the meat and changes how the meat holds moisture during cooking. It can also draw out a little surface moisture, dissolve, and move back into the meat. Given enough time in the refrigerator, the surface can dry out again, which helps with browning, poultry skin, bark, and smoke color.
Dry brining is most useful for cuts and cooks like these:
- Poultry skin: A refrigerated rest can help the skin dry, which gives you a better shot at browning.
- Steaks and chops: Weighing the salt makes it easier to repeat what worked, especially when the cuts are thick.
- Pork loin: Lean pork benefits from careful seasoning, but it is not as forgiving as pork butt.
- Ribs: A light dry brine can help, especially if you are using a salt-free or low-salt rub.
- Pork butt: Larger cuts can take more salt, but the rub still matters.
- Brisket: Dry brining works well when you are controlling salt separately from pepper, spices, or smoke.
- Rub-heavy barbecue: Dry brining can be useful, but only if you know whether the rub is adding more salt.
The science does not need to get complicated. Salt helps season the meat. Time helps the salt do its work. A drier surface helps browning because the surface is not spending as much heat driving off water before color can develop.
When to reduce or skip the salt
This is the part that saves more cooks than the percentage table. Not every piece of meat starts at zero salt.
If the meat or rub already brings salt, do not add a full dry brine on top without adjusting.
A lot of grocery-store meat already has salt in it. Enhanced chicken, self-basting turkey, injected brisket, kosher poultry, marinated pork, and commercial rubs can all change what you should do. The package label and ingredient list matter before the scale ever comes out.
Federal labeling rules require raw meat and poultry with added solutions to identify that added solution and its percentage. If you see language like “contains up to 12% solution,” that meat may already have water, salt, broth, flavorings, or other ingredients added.


Before you salt anything, check this list:
Reduce or skip added salt when
- The package says “contains up to X% solution,” “enhanced,” or “injected.”
- The product is self-basting, pre-basted, marinated, or pre-seasoned.
- The poultry is kosher and has already gone through a salting step.
- The rub lists salt first or second in the ingredients.
- The meat is already cured or smoked.
- The cut is very thin.
- You are working with fish.
- The meat is ground and will be shaped into burgers or patties.
When in doubt, check the label and use less salt. Extra salt is not a safety buffer.
Enhanced, injected, and self-basting meat
If the label says the meat contains an added solution, assume some salt is already in the meat. You may still season it, but do not treat it like plain meat.
This comes up all the time with supermarket poultry. It also shows up with some pork, turkey, and brisket products. The wording may say “enhanced,” “injected,” “self-basting,” “marinated,” or “contains up to X% solution.”
The better bet is to cut the salt way back or skip the dry brine and use salt-free seasoning.
Kosher poultry
Kosher poultry has gone through a salting process as part of koshering. That does not mean it will taste aggressively salty, but it does mean you should not assume it needs the same dry brine as unsalted poultry.
Use a much lighter hand, or skip the dry brine and season with salt-free spices.
Commercial BBQ rubs
A lot of BBQ rubs put salt and sugar near the front of the ingredient list, with spices behind them. If salt is first or second on the ingredient list, count the rub as part of the salt you are putting on the meat.
You have three good options:
- Dry brine with plain salt, then use a salt-free or low-salt rub.
- Skip the separate dry brine and let the rub be the salt.
- Use a reduced dry brine, then apply the rub lightly.
The exact salt content of a rub is not always obvious, so be careful. A full dry brine under a full coat of salty rub is where good meat can turn harsh.
Cured, smoked, fish, thin cuts, and ground meat
Already-cured or already-smoked products usually do not need a dry brine. They have already been salted as part of another process.
Fish and very thin cuts need caution because salt moves in quickly and the texture can change fast. Keep both the percentage and the time low.
Ground meat is a different case. Salting ground meat too early can make burgers tighter and more sausage-like. If you are making burgers, salt close to cooking instead of dry brining early.
How to dry brine meat by weight
The method is easy, but the order matters. Check for salt that is already there before you add more.
- Check the package label first. Look for “contains up to X% solution,” “self-basting,” “injected,” “marinated,” “pre-seasoned,” or similar language.
- Check the rub. If salt is near the top of the ingredient list, decide whether the rub will be your main salt source.
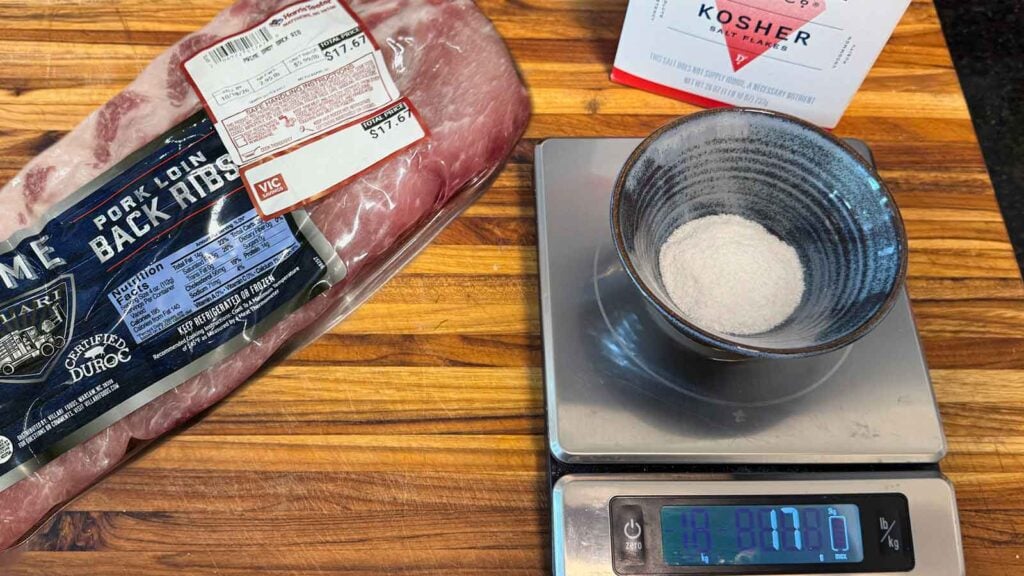
- Weigh the trimmed meat. Weigh the meat the way you plan to cook it, after any trimming that matters. For ribs and other bone-in cuts, weigh the piece as-is and stay cautious with the percentage.
- Choose a cautious salt percentage. Start lower for thin cuts, poultry, ribs, fish, salty rubs, and anything with added solution.
- Convert the percentage to grams. If the meat weighs 1,000 grams and you choose 1%, that means 10 grams of salt.
- Weigh the salt. Use a kitchen scale set to grams.
- Apply it evenly. Hit the top, bottom, sides, and ends. Large cuts need even coverage more than a heavy pile in one spot.
- Refrigerate on a rack or tray. A rimmed pan catches juices. A rack helps air move around the meat.
- Cook to a safe internal temperature. Dry brining seasons the meat. It does not change the temperature the meat must reach.
The two biggest mistakes are skipping the label check and adding a salty rub on top of a full dry brine.
How long to dry brine meat
Timing depends more on thickness than total weight. A thin pork chop and a whole pork shoulder should not be treated the same way just because the percentage was calculated by weight.
Also, more time is not the same as more salt. If you want a safer, more forgiving plan, start earlier and refrigerate properly. Do not add extra salt just in case.
Use these timing ranges as a cautious starting point:
- Thin steaks, chops, and small cuts: Salt right before cooking, or give them at least about 40 minutes if browning matters. The wet surface in between can work against a good crust.
- Thick steaks and chops: About 1 to 24 hours under refrigeration.
- Chicken pieces: About 4 to 24 hours under refrigeration.
- Whole chicken: About 12 to 24 hours. Go longer only if the chicken has no added salt solution and stays safely refrigerated inside the raw poultry storage window.
- Turkey breast or whole turkey: About 24 to 48 hours is the safer range for home cooks, especially because raw poultry has a short storage window.
- Pork loin and larger pork roasts: About 12 to 24 hours, up to 48 for larger pieces.
- Pork butt and brisket: About 24 to 48 hours, with the rub and label still guiding how much salt you use.
- Ribs: About 2 to 12 hours, up to 24 with caution.
- Fish: Fifteen minutes to a few hours, depending on thickness.
- Ground meat: Salt close to cooking.
All of that happens in the refrigerator. Raw meat does not get to sit out just because salt is on it. For a broader timing guide across wet brines, dry brines, poultry, pork, beef, and fish, use our guide to estimate brining time.
FoodSafety.gov’s cold food storage chart gives the safe refrigerator window as 1 to 2 days for raw poultry, 1 to 2 days for raw ground meats, and 3 to 5 days for raw beef, pork, lamb, and veal steaks, chops, and roasts. Dry brining does not extend those windows.
Food safety while dry brining
This is still raw meat handling. Salt does not make it safe to leave meat out.
The meat should stay refrigerated at 40°F or below. That lines up with the CDC’s basic Clean, Separate, Cook, and Chill guidance. Do not leave meat to dry brine on the counter, in a garage, or in a cooler that you are not actively controlling.
Use a rimmed pan to catch juices. Store raw meat below foods that will not be cooked. Wash your hands, tools, cutting boards, and counters after handling it.
For cooking, follow safe internal temperature guidance. USDA FSIS lists poultry at 165°F, ground meats at 160°F, and whole cuts of beef, pork, lamb, and veal at 145°F with a three-minute rest. BBQ cuts like pork butt and brisket usually go much higher for tenderness, but that is a texture decision beyond the safety floor.
Food safety note
- Dry brine in the refrigerator at 40°F or below.
- Use a rimmed tray or pan to catch raw juices.
- Store raw meat below ready-to-eat foods.
- Stay inside the safe raw storage window: 1 to 2 days for raw poultry and raw ground meats; 3 to 5 days for raw beef, pork, lamb, and veal steaks, chops, and roasts.
- Wash hands, tools, cutting boards, and counters after handling raw meat.
- Cook meat to a safe internal temperature: 165°F for poultry, 160°F for ground meats, and 145°F with a 3-minute rest for whole cuts of beef, pork, lamb, and veal.
- Dry brining seasons meat. It does not preserve it.
Dry brine vs dry cure
These two terms sound close, but they are not the same job.
A dry brine uses plain salt for seasoning before cooking. It happens under refrigeration, and the meat still needs to be cooked safely.
Dry curing is a separate preservation process. It may involve Cure #1, also called Prague Powder #1, which contains sodium nitrite. Cure #1 is not regular salt, and it is not interchangeable with kosher salt or table salt.
Bacon, ham, pastrami, corned beef, cured sausage, and similar projects need dedicated curing guidance. If you are working with curing salt, use our Cure #1 safety guide instead of dry-brine percentages.
Dry brine is not dry cure
- Dry brining seasons meat before cooking.
- Dry curing is a separate preservation process.
- Cure #1 and Prague Powder #1 contain sodium nitrite and are not regular salt.
- Do not use dry-brine percentages for bacon, ham, pastrami, corned beef, cured sausage, or other curing projects.
Use the Brining Calculator for exact grams
Once you know the meat weight and have checked the label and rub, the next step is getting the exact amount of salt.
That is where the Brining Calculator helps. Enter the meat weight, choose dry brine mode, and let the calculator give you the grams for the percentage you want to use.
Get the exact grams
- Weigh the meat first.
- Check whether the meat or rub already contains salt.
- Choose a cautious dry-brine percentage.
- Use the calculator for the exact salt amount.
This page helps you decide how much salt makes sense. The calculator gives you the grams.
Dry brining by weight: questions before you salt
Dry brining works best after the meat is thawed enough for salt to contact the surface evenly. Salt sitting on icy patches will not season the meat the same way. Thaw the meat safely in the refrigerator first, or wait until the surface is thawed before salting and starting your dry-brine timing.
Weigh the meat after trimming, or at least after any major trimming that changes the amount you plan to salt. If a brisket loses a pound of hard fat, that pound should not count toward the salt calculation. For bone-in cuts, weigh the piece as you will cook it, then keep notes so you can adjust next time.
Use a scale that reads in grams, and preferably tenths of a gram for very small pieces of meat. If your scale jumps around with small amounts, do not guess by spoonfuls unless you have no choice. For small cuts, start low, weigh carefully, and keep notes so you can repeat what worked.
It depends on the rub. If the rub is salt-free or very low in salt, you can dry brine first and add the rub before cooking. If salt is one of the first ingredients, treat the rub as part of the salt. In that case, reduce the dry brine or let the rub do the salting.
Yes, if the meat is on a rimmed pan or rack and cannot drip onto other food. Leaving it uncovered can help the surface dry, which is useful for poultry skin, bark, and browning. Keep it refrigerated at 40°F or below the whole time, and stay within safe raw storage windows.
Usually, no. If you measured the salt by weight and applied it evenly, rinsing can wash away seasoning, wet the surface, and raise cross-contamination concerns. Pat the meat dry if needed, then add any salt-free or low-salt rub before cooking. If you clearly used too much salt, scrape or wipe off what you can.
Corrections and editorial standards
- Spotted something wrong or outdated? Send a correction here: Corrections & Updates
- How we handle sources, testing, and updates: Editorial Standards
- Media or general notes: Email the publisher
Sources
This page combines practical dry-brining guidance with food-safety references, salt weight data, and labeling rules for meat and poultry with added solutions. The percentage ranges use a cautious home-cook approach: lower for poultry, thin cuts, fish, salty rubs, and meat with added solution; higher only for larger unsalted BBQ cuts like pork butt and brisket.
- USDA FSIS, Safe Minimum Internal Temperature Chart: source for safe internal temperature guidance for poultry, ground meats, and whole cuts
- FoodSafety.gov, Cold Food Storage Chart: source for safe raw storage windows for poultry, ground meats, and whole beef, pork, lamb, and veal cuts
- CDC, Preventing Food Poisoning: supports refrigeration, separation, cleaning, and safe raw-meat handling guidance
- Federal Register, Descriptive Designation for Raw Meat and Poultry Products Containing Added Solutions: source for label requirements on raw meat and poultry with added solutions
- UC Agriculture and Natural Resources, Salt for Preserving and Cooking: source for salt weight differences between Diamond Crystal kosher salt, Morton kosher salt, and table salt
- Serious Eats, Dry-Brining Is the Best Way to Brine Meat, Poultry, and More: supports the explanation of how dry brining seasons meat, uses surface moisture, and helps with browning
- AmazingRibs, The Science of Curing Meats Safely: supports the distinction between dry brining, dry curing, Cure #1, and regular salt
About the author
James Roller documents South Carolina barbecue for Destination BBQ and authored the SC BBQ cookbook Going Whole Hog. His BBQ guides focus on practical planning questions, including how much food to buy, how to avoid running short, and how to use reliable meat-cut and food-safety guidance without making backyard cooking more complicated than it needs to be.