
Learn how 2-zone grilling lets you sear hot on one side, finish gently on the other, and handle flare-ups without burning dinner
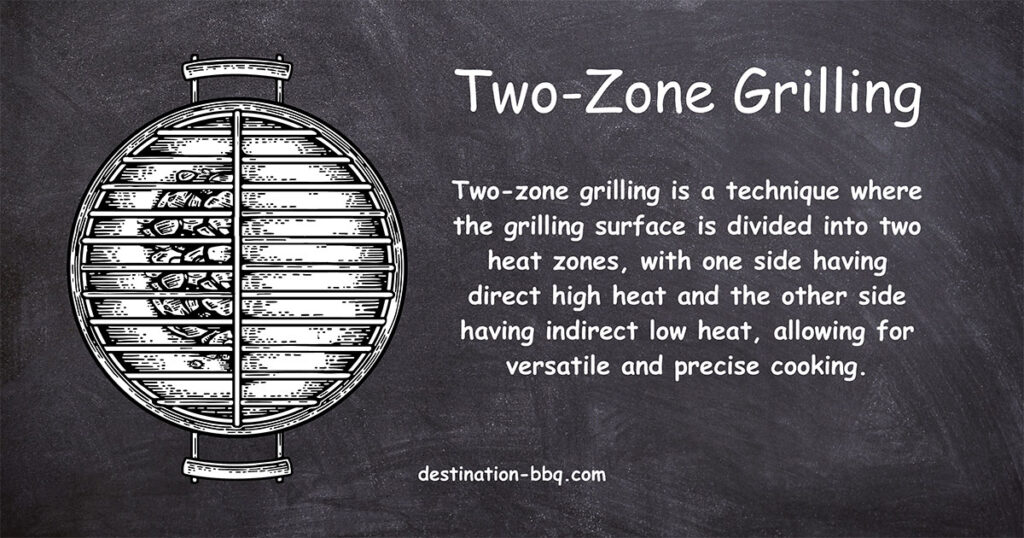
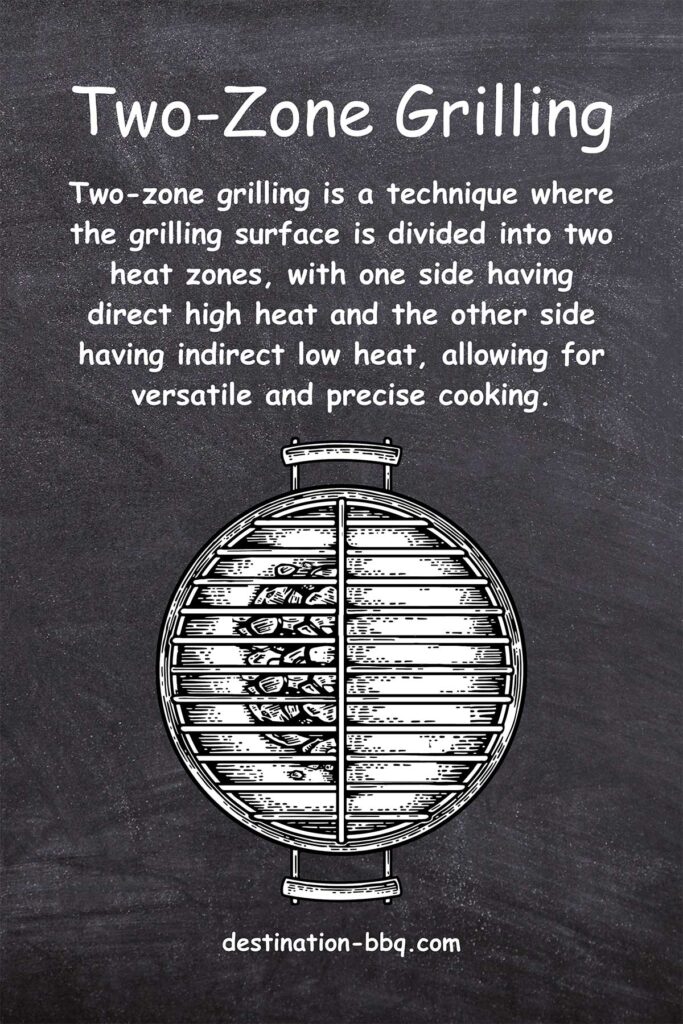
What is 2-Zone Cooking or Grilling?
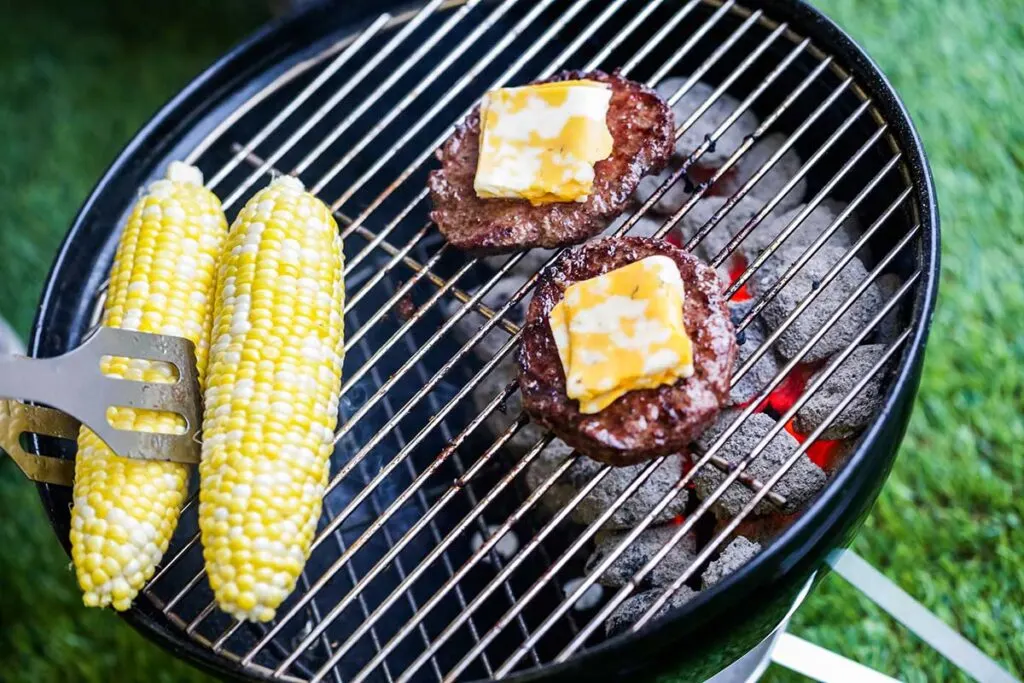
Two-zone grilling is a method of cooking on a grill where the cooking surface is divided into two distinct heat zones: a direct heat zone and an indirect heat zone. In the direct heat zone, food is placed directly over the flames or heat source for quick searing and browning.
On the other hand, the indirect heat zone involves placing the food away from the direct heat source, allowing for slower and more controlled cooking. This technique provides greater flexibility, enabling simultaneous cooking of different foods with varying cooking requirements, and allows for precise control over the cooking process to achieve optimal results.
- Light a chimney until coals are ashed over.
- Bank coals to one side (direct zone); leave the other side empty (indirect).
- Set a drip pan under the indirect side (optional but helpful).
- Lid on to preheat; adjust vents to stabilize.
- Cook indirect; finish over direct to brown/sear.
- Preheat grill.
- Two burners: one on / one off.
- Three burners: outer burners on, center off.
- Four burners: two adjacent on, two off (create a clear cool zone).
- Cook over the off burner (lid closed), then finish over a lit burner.
- Burgers, hot dogs
- Thin steaks, chops
- Kebabs, many veggies
- Final sear/crisping
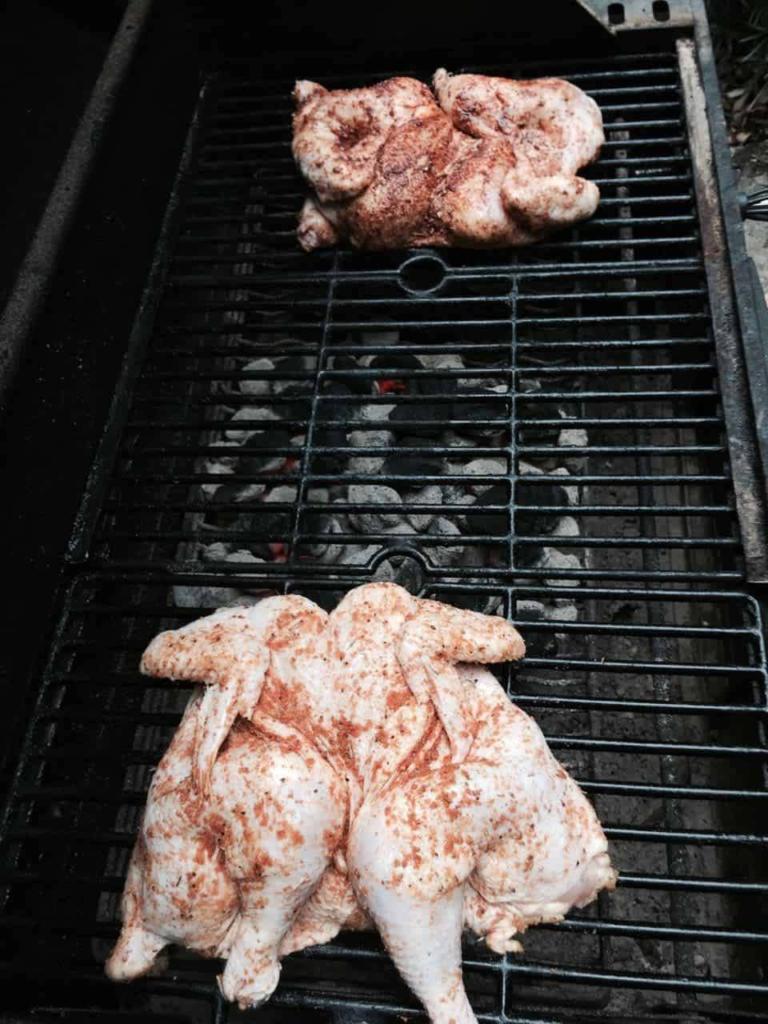
- Ribs, whole chicken
- Roasts, pork shoulder
- Thick steaks before sear
- Wings to render, then finish direct
- Reliable digital thermometer (grate-level probe)
- Long-handled tongs or spatula
- Heat-resistant gloves
- (Charcoal) Chimney starter & baskets
- (Gas) Spare tank or known fuel level
Key Takeaways
- Two-zone grilling involves dividing the grill into two heat zones: direct and indirect.
- The direct heat zone is used for quick searing and browning, while the indirect heat zone allows for slower and more controlled cooking.
- This method offers the flexibility to cook different foods simultaneously and provides precise control over the cooking process for optimal results.

Dual-zone grilling is one of those BBQ skills that can completely change your grilling game. By having one side of your grill over direct heat and having the other side over indirect heat, you have better control over how hot and fast your food cooks.
Susie Bulloch, Hey Grill Hey
Direct vs Indirect Grilling: The Foundation
Direct grilling places food directly over the heat source, creating intense radiant heat perfect for searing, browning, and quick-cooking items like burgers, steaks, and vegetables. The high heat (typically 400-500°F) creates the Maillard reaction for those coveted grill marks and caramelized flavors.
Indirect grilling positions food away from the heat source, using convection heat similar to an oven for gentle, even cooking of larger items like whole chickens, roasts, and ribs. This method prevents burning while allowing thorough cooking at lower temperatures (225-350°F). The genius of 2-zone grilling? You get both options simultaneously on one grill.
Understanding Two-Zone Grilling
Imagine the sizzle of juicy steaks hitting the grill, the tempting aroma of perfectly charred vegetables, and the sound of laughter as friends and family gather around, eagerly anticipating a mouthwatering feast. It's time to put your cooking skills to the test.
But wait… have you ever found yourself faced with the specter of overcooked or undercooked food? We've all been there, trying to salvage a hockey puck-like steak or anxiously rushing to finish cooking while hungry guests drum their fingers in anticipation.
Avoid disaster by learning 2-zone grilling.
Mark Jenner, the founder and chief editor of FoodFireFriends.com, passionately proclaims, "I never, and not for years now, ever set up a charcoal grill for high heat grilling without an indirect cooler temperature zone."
Let those words sink in.
You'll see this technique used by veteran pitmasters all the time. For instance, James Beard Award winner Rodney Scott applies this in his spareribs recipe and in his smoked turkey recipe.
In this comprehensive guide, we'll share the secrets of the two-zone cooking method, showing you how to divide your grill into two distinct zones and apply different levels of heat to each. It's like having the best of both worlds – the sizzling intensity of direct heat and the gentle embrace of indirect heat.
We'll walk you through the science, the setup, the techniques, and even the pitfalls to avoid. Are you ready to take your grilling skills to new heights? Let's dive into the smoky realm of dual-zone grilling.
The Science Behind 2-Zone Grilling
Now, let's delve into the science behind two-zone grilling and understand why it's a trusted technique for veteran pitmasters.
Meathead Goldwyn, the publisher of amazingribs.com and author of Meathead, The Science of Great Barbecue and Grilling, explains the importance of temperature control: "To cook delicious food, you need to control your cooking temperature because the compounds in foods react differently to different levels of heat."
Each component of the foods you put on the grill – proteins, fats, sugars, and more – undergoes remarkable transformations at different temperatures.
For example, fats render, water evaporates, collagens melt, sugars caramelize, the Maillard reaction occurs (browning), and carbonization (charring) becomes a risk. Achieving the ideal temperature for each component is the key to unlocking mouthwatering flavors and textures.
Here's where the 2-zone cooking setup helps. It provides you with precise control over temperature. By creating two distinct zones on your grill – a direct heat zone and an indirect heat zone – you can tailor the cooking environment to suit the specific needs of different foods.
In the words of Meathead, "Using a 2-zone grilling setup allows us to control the temperature applied to the food. We can gently heat a turkey in the indirect zone, get it cooked to juicy, tender, smoky perfection, and be the heroes of Thanksgiving."
Imagine the possibilities...
Slowly roasting a big prime rib to medium-rare with a perfect crust, tenderizing tough cuts of meat without drying them out, or crisping up chicken skin to golden brown. With dual-zone grilling, all of that and more is possible.
But it's not just about temperature control. The two-zone setup also allows you to cook multiple foods simultaneously, each requiring different cooking times and heat levels.
Meathead emphasizes the versatility of this technique, stating, "A 2-zone grilling setup is especially handy if you have more than one food cooking at once, where the thickness and water content of the two is significantly different so they will cook at different rates."
With the power of the two-zone cooking method, you can cater to different preferences and ensure each dish is cooked as it should be.
With practice, this technique will improve your food. Control and precision make all the difference.
Setting Up Your Grill for 2-Zone Grilling
Whether you're working with a charcoal grill, a gas grill, or even an electric grill, the principles remain the same: divide your grilling surface into two distinct zones, each offering different heat levels.
Meathead sheds light on this essential step, stating, "When you shop for a grill, you must get one that allows you to configure it in two zones." It's crucial to ensure that your grill provides the flexibility necessary for this technique, allowing you to create a direct heat zone and an indirect heat zone.
Here's how you can set up your grill:
Charcoal Grill
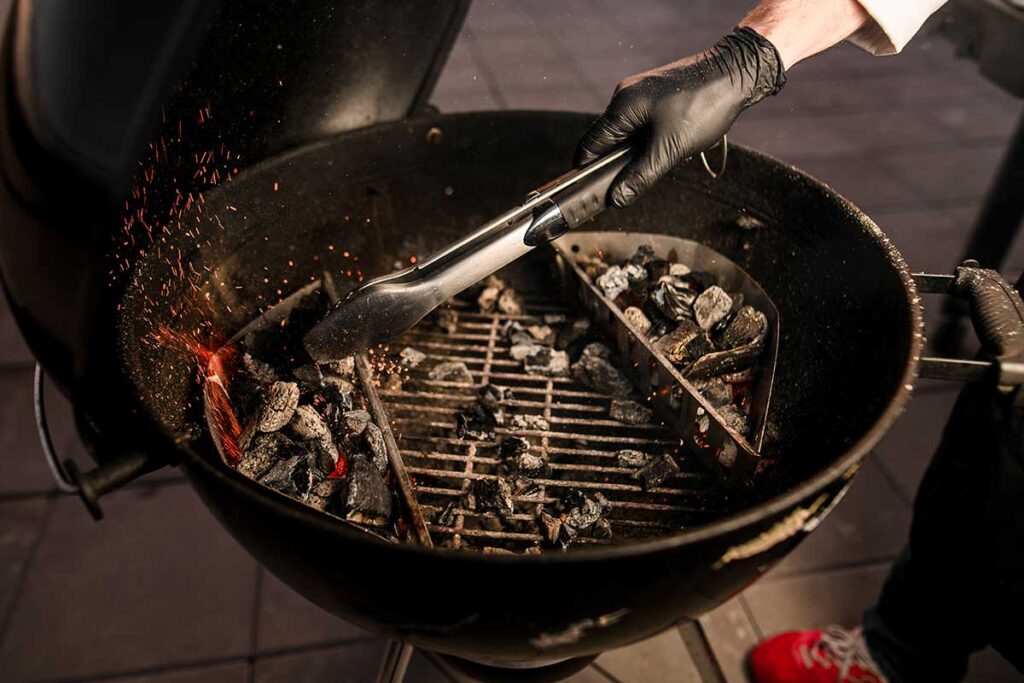
- Get your charcoal going until it's white-hot using a charcoal chimney starter.
- Instead of spreading the coals evenly across the lower grate, bank the coals all to one side of the grill. This concentrated pile of coals will serve as your direct heat zone. The Slow n Sear is a popular charcoal basket that makes banking coals simple.
- The other side, where there are no coals, will be your indirect heat zone.
Gas Grill
- If you have a gas grill with multiple burners, turn only one or two burners on high to create the direct heat zone.
- Leave the remaining burners off to establish the indirect heat zone.
- Meathead suggests, "You may find that you can hit the 225°F mark with a three-burner gas grill by turning one burner on medium and the other two off. Or maybe it needs to be on low."
- Take the time to familiarize yourself with your specific grill and the settings required to achieve the desired temperature differentials.
Electric Grill
- Electric grills typically have heating elements that cover the entire grilling surface.
- To create a two-zone setup, you can use physical barriers like heat-resistant dividers or foil-wrapped bricks to create a direct heat zone and an indirect heat zone.
- Position the heating elements beneath one side of the grill to establish the direct heat zone, while leaving the other side without direct heat for the indirect zone.
Remember, understanding the unique configuration of your grill and mastering the temperature differentials are essential. As Meathead notes, "You need to get to know your instrument and master the concept." Practice and experimentation will help you fine-tune the setup that works best for your specific grill.
With your grill set up with a two-zone fire, you're now equipped to take full control over the cooking process, ensuring each food item receives the ideal heat treatment. In the next section, we'll explore the art of mastering the different heat zones and the culinary possibilities they offer.

Mastering the Two Heat Zones
Now that you have your grill set up for two-zone smoking, it's time to understand the unique characteristics of each heat zone and how to leverage them. The direct heat zone and the indirect heat zone each play a crucial role in achieving optimal results.
Direct Heat Zone
The direct heat zone is where the flames or heating elements directly heat the food, creating intense radiant heat. This zone is perfect for quick searing, achieving beautiful grill marks, and adding that coveted caramelization.
Jenner emphasizes the versatility of the direct heat zone, stating, "You always have that high heat option on the other side of the grill if you need it."
Indirect Heat Zone
On the other side of the grill lies the indirect heat zone, where there is no direct heat source beneath the food. This zone relies on convection heat, similar to an oven, to cook food gently and evenly.
Meathead highlights the benefits of the indirect heat zone, stating, "It allows us to control the temperature applied to the food… we can cook large slow-cooking pieces alongside small quick-cook veggies and small pieces of meat."
By utilizing both heat zones, you gain unparalleled control over the cooking process. Here's how to harness the power of each zone:
Direct Heat Zone
- Place foods that benefit from high heat and quick cooking in this zone, such as burgers, thin steaks, fish fillets, and vegetables.
- Flip the food as needed to ensure even cooking and achieve desired browning or searing.
- Remember to keep a close eye on foods in the direct heat zone to prevent burning or overcooking.
Indirect Heat Zone
- Foods that require slower and more gentle cooking shine in the indirect heat zone. This includes larger cuts of meat like Boston butts, whole chickens, spare ribs or baby back ribs, and brisket.
- Start these foods in the indirect heat zone to allow for thorough cooking without excessive charring or drying out.
- After the initial phase of cooking in the indirect zone, you can finish certain items in the direct heat zone to enhance texture and create a flavorful crust.
The beauty of this method is that it provides the flexibility to simultaneously cook different foods with varying cooking times and requirements. You can keep foods warm in the indirect zone while others continue to cook in the direct zone.
As Jenner rightly puts it, "You keep everyone happy" by catering to individual preferences and ensuring each item is cooked to perfection.
Temperature Control and Calibration
Controlling temperature is crucial for success in barbecue. While grilling outdoors presents unique challenges, understanding temperature dynamics and implementing proper calibration techniques can greatly improve your finished product.
One of the keys to temperature control is calibrating your grill or smoker. As Meathead, the renowned grilling expert, advises, "The first thing to do after you assemble your new grill or smoker is to season it and calibrate it by doing a few dry runs without food." This process helps burn off any residual manufacturing grease and allows you to familiarize yourself with the grill's temperature patterns.
Since every grill is different, it's essential to use a reliable thermometer for accurate temperature readings.
As Jenner emphasizes, "You cannot trust your grill's thermometer. You absolutely must get a good digital thermometer for your grill." Investing in a quality digital thermometer will provide you with accurate temperature readings, enabling you to fine-tune your cooking process.
(We recommend the Thermapen One.)
In outdoor grilling, external factors like weather conditions can impact temperature control. Sun, wind, rain, or snow can all affect the grill's heat distribution and overall cooking temperatures. Therefore, it's crucial to be aware of these elements and make adjustments accordingly.
As Meathead points out, "Outdoor grilling is less of a perfect science than your kitchen oven cooking," so being adaptable and making adjustments based on real-time conditions is key.
Remember, temperature control is not a one-size-fits-all approach. It requires some trial and error to understand your specific grill's behavior and how it responds to different settings. Experimenting with different burner configurations, coal arrangements, or heat adjustments will help you achieve the desired temperature ranges for your direct and indirect zones.
By paying attention to temperature control, calibrating your grill, and using reliable thermometers, you'll gain the confidence and ability to fine-tune your grilling technique, ensuring perfectly cooked and flavorful results every time.
Stay tuned for the next section, where we'll share additional expert tips and insights.
Expert Tips and Insights for Dual-Zone Grilling
To truly master the art of dual-zone grilling, it's valuable to glean wisdom and insights from experienced grillmasters, chefs, and experts in the field. Their tips and advice can help you refine your techniques and elevate your grilling game. Here are some things to consider:
- "Two-zone grilling also provides you with a 'safety net,'" writes David Johnson on Barbecue Logic. "Maybe the flame is suddenly flaring, and the temperature is getting a little out of hand, move it to the indirect zone until you regain control."
- Jenner highlights the significance of experimentation: "Every grill is different, and you may need to experiment with burner configurations or coal arrangements to achieve the right balance of high and low heat. Don't be afraid to adjust and fine-tune to find what works best for your specific grill."
- Seasoned grillmasters recommend using a water pan in the indirect zone to add moisture and flavor to your dishes. According to Meathead, "A water pan adds humidity to the cooking atmosphere, keeping the meat moist and juicy. It also helps absorb heat, helping to maintain a lower temperature in the indirect zone."
- When it comes to transitioning between zones, renowned chefs advise being mindful of timing and temperature considerations. As Meathead suggests, "Move your food to the direct zone at the right moment to achieve the desired sear and caramelization. Be attentive and watch for the perfect balance of searing, cooking, and finishing."
By incorporating these expert tips and insights into your approach, you'll gain a deeper understanding of the nuances involved and refine your skills to create memorable, mouthwatering dishes that will impress family and friends.
Mastering dual-zone heat is powerful—but pairing the right wood can improve your flavor. Check our interactive wood-meat pairing guide.
Troubleshooting 2-Zone Grilling Issues
Two-zone grilling gives you a margin for error. When something goes sideways, use the quick fix now, then adopt the “prevent next time” habit so it doesn’t recur. Skim the first column to find your issue fast.
| Symptom | Likely Cause | Quick Fix (Now) | Prevent Next Time |
|---|---|---|---|
| Flare-ups over direct heat | Fat dripping onto coals/burners; lid open feeding oxygen | Move food to indirect, close lid 30–60 sec, let flames die | Place a drip pan under food; trim excess fat; keep grates clean |
| Outside dark, inside underdone | Cooking entirely over direct heat; indirect too hot | Shift to indirect until near target temp; finish with a brief sear | Use two-zone; target ~225–300°F indirect for most meats |
| Can’t reach 225–300°F indirect | Too little fuel; vents too closed; cold/windy weather | Open intake vent; add lit coals; shield grill from wind | Start with more fuel; preheat longer; consider a windbreak |
| Indirect runs too hot (≥350°F) | Too many coals; exhaust restricted; burner too high | Close intake slightly; move coals apart; turn burner down/off | Use baskets/Snake Method; leave exhaust fully open |
| Harsh/bitter smoke | Smoldering wood; too much wood; wet/green chunks | Open vents to clean up the fire; remove excess wood | Burn clean blue smoke; use 1–2 fist-size chunks, dry/seasoned |
| Pale or rubbery chicken skin | Heat too low; moisture pooling; no dry air time | Finish over direct heat; briefly vent to dry skin | Air-dry skin in fridge; run 300–325°F indirect; finish hot |
| Uneven cooking / hot spots | Coal pile shaped oddly; burner pattern uneven | Rotate the grate or the food halfway through the cook | Bank coals in an even mound; on gas, use outer burners only |
| Thermometer seems “wrong” | Lid dial reads dome air; probe not at grate level | Place a digital probe at grate level near the food | Calibrate thermometers; trust grate-level readings over lid dials |
| Charcoal fire dies mid-cook | Airflow choked by ash; fuel not staged | Open vents, tap ash grate; add a few lit coals | Use the Snake/Minion method; knock ash down every hour |
| Grease fire in drip pan | Pan overfills or sits too close to coals/burner | Close lid; move food away; carefully remove/replace pan | Use a larger pan with water or change it mid-cook if needed |
Pro tips:
- Preheat fully; stabilize the indirect zone at ~225–300°F before adding food.
- Keep the exhaust vent open; control heat with the intake (charcoal) or burner knobs (gas).
- Check temps at grate level with a digital probe; don’t trust lid dials for precision.
- For fatty cooks, drip pan + two-zone = built-in safety net.
2-Zone Grilling FAQ
Fat ignites over direct heat. With two-zone, move food to indirect, close the lid to limit oxygen, and let flames die. Keep grates clean, place a drip pan under fatty foods, and skip water (it spreads grease). Return to direct heat to finish, checking doneness with a digital thermometer.
Add fresh charcoal to the direct zone every 45-60 minutes, banking it against existing coals. For gas grills, adjust burner settings as needed. Use a grill thermometer in each zone to monitor temperature drift.
Use indirect for thicker cuts and foods needing time: whole chicken, ribs, pork shoulder, thick steaks before searing, even wings to render fat. Use direct for quick items (thin steaks, burgers, kebabs, many veggies) and for final browning. In flare-ups, shift to indirect immediately.
Common causes: too many coals banked, lid vents too open, or heat deflection issues. Reduce coal quantity, close top vents partially, or create more distance between coals and indirect zone.
Move food to direct heat during the last 5-10 minutes of cooking to develop a crust or sear. For thick steaks, reverse-sear by cooking indirect until 10°F below target temperature, then sear over direct heat.
About the author
James Roller documents South Carolina barbecue for Destination BBQ and authored Going Whole Hog. He researches techniques, interviews pitmasters, creates tools, and curates reliable sources so home cooks can cook barbecue safely and confidently at home.
More about James.See something that needs a tweak? Send a correction.
« See All BBQ Terms