Compare five methods to cook chicken wings for a crowd with capacity limits, batch timing, holding that keeps the skin crisp, and safe internal temperatures
Cooking wings for a crowd is mostly a capacity + crispness + timing problem. In my experience, when you crowd the pan, trap steam, or sauce too early, wings go soft fast.
Quick note so we’re talking about the same thing: throughout this guide, wings means flats and drumettes (party wings), not whole wings.

This guide compares the big five methods and gives a workflow you can actually run at party scale for home cooks feeding about 10–50+ guests. If you’re looking for the best way to cook wings for a party, start with the quick pick guide, then use the table to match your method to your space, time, and crispness goal.
For quantity planning (without guessing), use our Wing Calculator. If you’re still deciding what to buy, start with our wing buying guide.
How this guide was built: I’ve cooked a lot of wings for home get-togethers, but I didn’t write this from memory alone. The backbone of this guide is research. I cross-checked reputable technique sources and food safety guidance, then organized the advice around what actually trips people up when they scale: space, batches, holding, saucing timing, and a reliable temperature check. If any technique terms are new, our BBQ glossary may help.
Quick pick guide
Pick Method by Desired Outcome
- Maximum crispness: deep fry
- Most wings with the least stress: oven
- Outdoor flavor with solid texture: grill
- Smoke flavor with a planned hot finish: smoker
- Comfortable appliance, served in batches: air fryer
If wings have to wait, follow our plan to keep wings hot and crispy with a rack hold, transport fixes, and a quick re-crisp finish.
Methods compared
Use this table to pick your cooking method fast. It compares crispness, capacity, hands-on effort, and how each option fits a party workflow.
| Method | Best for | Crispness potential | Capacity and scaling limits | Hands-on level | Indoor or outdoor | Mess and smell | Make-ahead friendly | Notes and gotchas |
|---|---|---|---|---|---|---|---|---|
| Oven | Big batches with consistent results | High | High, limited by sheet-pan space and air circulation | Low to medium | Indoor | Low | Good | Overcrowding causes steaming and soft skin |
| Deep fry | Maximum crunch and fast serving batches | Very high | Medium, limited by pot size and oil recovery | High | Best outdoors | High | Good | Small batches keep oil temp stable |
| Grill | Outdoor party flavor with crisp edges | Medium to high | Medium, limited by grate space and hot spots | Medium | Outdoor | Medium | Medium | Two-zone cooking prevents burnt skin and underdone centers |
| Smoker | Smoke flavor and make-ahead workflow | Low without finish, medium with hot finish | High if you have racks and airflow | Low to medium | Outdoor | Medium | Excellent | Plan a hot finish if you want crisp skin |
| Air fryer | Batches for small to medium crowds | High | Low per batch, scales by rounds or multiple units | Medium | Indoor | Low | Medium | Basket crowding turns crisp skin soft fast |
Once you’ve chosen a method, figure out your sauce amounts per pound.
Party workflow that works for any method
The key to batch cooking chicken wings is treating airflow, holding, and saucing as part of the cook, not afterthoughts.
Party workflow playbook
- Airflow is the whole game: single layer, racks when possible, no covered pans.
- Hold dry, not stacked: finished wings stay unsauced on racks in a 170–200°F oven, uncovered.
- Sauce to order: toss only the batch that is hitting the platter right now.
- Finish hot when texture dips: quick high-heat pass to re-crisp, then spot-check 165°F+.
- Fast diagnostics: wet halfway through means crowding; rubbery skin means not enough high heat time; soft after holding means stacking or covering.
Use the workflow table below for the phase-by-phase plan, and the capacity table for constraint fixes.
Once you pick a method, use the wing party checklist to plan your batches and serving window.
Workflow and capacity cheat sheets
Use the first table for the basic workflow, then the second to solve common space and timing constraints.
| Phase | What you do | What it solves |
|---|---|---|
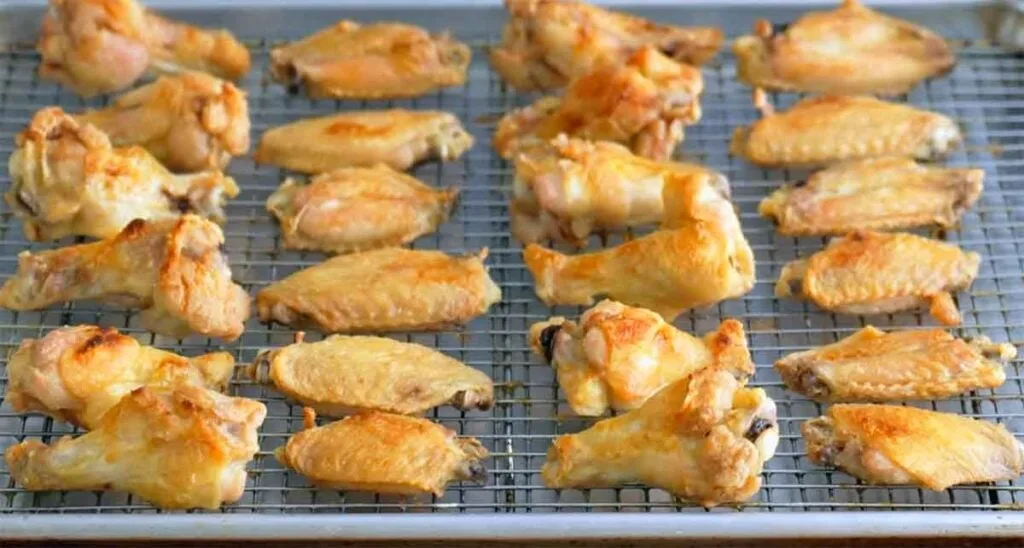
| Prep | Pat wings very dry, with an optional uncovered fridge-dry on a rack | Less surface moisture, better browning, and less steaming |
| Season | Use dry rub and salt; add baking powder only if your method supports it | Improves browning and texture when used correctly |
| Cook | Run batches with spacing and airflow as the priority | Heat stays high, and the skin crisps instead of softening |
| Hold | Hold wings unsauced on a rack so steam can escape | Keeps wings hot without trapping moisture against the skin |
| Finish | Use a short hot pass if you need to re-crisp before serving | Restores texture right before the wings go on the platter |
| Sauce | Toss to order or serve sauce on the side | Prevents sauce from softening the skin during holding |
| Constraint | Best fix | Avoid | Methods that fit best |
|---|---|---|---|
| Limited oven space | Use the oven as a holding and re-crisp station while cooking elsewhere | Cooking everything at once on crowded pans | Grill, smoker, deep fry + oven hold |
| Small fryer or one pot | Fry in steady batches, keep batches small, and hold finished wings on racks in a low oven | Overloading the pot and letting the oil temperature crash | Deep fry for batch serving |
| One air fryer | Plan on multiple batches, then hold finished wings on racks in a low oven | Piling wings in the basket | Air fryer as a supplemental method or batch-serving method |
| Serving over time | Hold wings unsauced on racks, then sauce only what goes on the platter | Saucing everything early, then holding | All methods |
| Make-ahead needed | Cook ahead to 165°F or higher, chill fast, refrigerate, then finish hot so the wings reheat to 165°F and the skin crisps again | Covering hot wings in a closed container | Smoker + hot finish, oven |
| Transporting wings | Vent steam during transport, then re-crisp on arrival if possible | Sealing hot wings tight and stacking them | Oven, smoker + hot finish |
Capacity note: The capacity numbers in this guide are planning ranges for typical home setups. Wing size, starting temperature, and crowding change how many wings you can cook at a time.
Oven
Method snapshot
- Best for: big batches with consistent results
- Crispness: high with racks and spacing
- Capacity: high, limited by sheet-pan space
- Hands-on: low to medium
- Make-ahead: good, especially if you hold unsauced
Best use case for a crowd
The easiest way to cook a lot of wings with consistent results and without standing over a burner.
What you need
- Sheet pans
- Wire racks for the pans (strongly recommended)
- Instant-read thermometer (recommended)
When you scale oven wings, the bottleneck is almost always rack space and airflow, not oven temperature.
Capacity reality check

How many wings fit on a sheet pan? On a standard 18×13 half sheet with a rack and breathing room between pieces, plan on about 18–24 wings, as they vary in size. If you pack them tighter, you can fit more, but you will trade crispness for steaming. Overload check: if wings look wet halfway through, spread them out or plan another round.
Most home ovens run best with 1–2 half sheets at a time when you are prioritizing airflow. That usually works out to about 18–48 wings per round depending on your rack positions, pan size, and how much space you keep around each piece. If you can fit more pans but notice soft skin or uneven browning, you are better off doing batches and using a dry rack hold between rounds.
Step-by-step workflow for a crowd
- Dry the wings: Pat very dry. If you can, fridge-dry uncovered overnight on a rack.
- Season: Salt plus dry rub, and optionally aluminum-free baking powder (about 1 teaspoon per lb) for extra crisp skin, as in J. Kenji López-Alt’s method at Serious Eats. Use baking powder, not baking soda. Mix it thoroughly with the salt and rub to avoid bitter pockets.
- Rack them: Arrange wings on wire racks over sheet pans, leaving space.
- Two-stage bake: start at 250°F to render, then finish at 425°F until crisp and 165°F+ on the thickest pieces.
- Hold smart if needed: Move finished wings to a rack in a 170 to 200°F oven while the next tray cooks. Keep them uncovered.
- Sauce at the end: Toss right before serving.
Crispness tips that matter
- Do not crowd. Crowding is the fastest way to soggy wings.
- Racks matter because fat drips away and hot air hits all sides.
- If your wings are rubbery, they usually need more time at high heat, not less.
Common failure points and fixes
- Soggy skin: wings were crowded or covered. Fix with a short blast in a hot oven, spread out.
- Rubbery skin: not enough high heat time. Finish hotter or longer, then sauce right before serving.
- Uneven browning: swap tray positions partway through the high-heat stage.
How to serve
- Serve unsauced wings on a platter and offer sauces, or toss small batches to order.
- If you want a Southern classic with smoked or grilled wings, try this Alabama white sauce recipe. New to it? See Alabama white sauce explained for what it is and why it works so well on wings.
- If wings need to sit, keep them unsauced on a rack so steam can escape, then sauce right before serving.
Deep fry
Method snapshot
- Best for: maximum crispness and fast serving batches
- Crispness: very high
- Capacity: medium, limited by pot size and recovery time
- Hands-on: high
- Make-ahead: good if you keep wings on racks, uncovered
Best use case for a crowd
When maximum crunch is the priority and you can commit to batch work (or you have help).
What you need
- Heavy pot or fryer
- Oil thermometer
- Instant-read thermometer (recommended)
- Spider or tongs
- Wire rack set over a sheet pan
Safety note: Fry outdoors when you can, keep kids and pets well back, never fill the pot more than halfway with oil, and keep a lid nearby to cover the pot if something flares up (never use water). The USDA has a deep-fat frying safety overview (burn/fire risk, thermometer use, safe handling).
Capacity reality check

In a typical home pot, plan on about 8–12 wings per batch if you want the oil to recover quickly. Let the oil climb back toward 350°F between batches. Pot size, oil depth, and starting wing temperature can push that number up or down. Overload check: if the oil temperature drops hard after you add wings and takes a while to climb back, your batches are too big.
Step-by-step workflow for a crowd
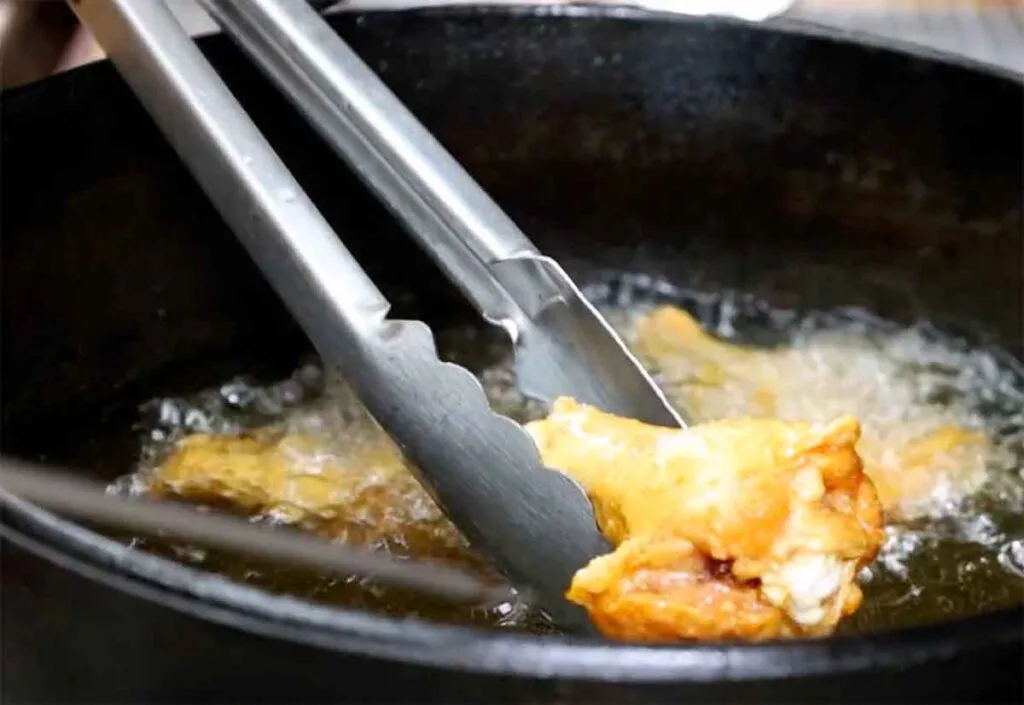
- Set up draining and holding: Wire racks over sheet pans, plus a 200°F oven ready if you need to hold batches.
- Heat oil to 350°F.
- Fry in small batches until golden and the thickest pieces hit at least 165°F, then drain on racks.
- Hold on racks in a low oven while you finish. Do not cover.
- Sauce to order right before serving.
Crowd upgrade: double-fry workflow
If you want to make serving easier (especially for a party), the double-fry approach is optional but useful because it lets you cook wings through ahead of time, then do a quick final crisp right before they hit the platter.
- First fry (cook-through): Fry at about 275 to 300°F until the thickest pieces reach 165°F+ but the skin is still pale.
- Finish fry (crisp): Right before serving, fry at 375 to 400°F for 2 to 3 minutes to crisp, then spot-check a couple pieces to confirm 165°F+. This short final fry makes it easier to serve hot batches.
Crispness tips that matter
- Oil temperature is the whole game. Let the oil return to temp between batches.
- Frying wet wings creates violent bubbling and slows crisping. Pat dry first.
Common failure points and fixes
- Greasy wings: oil was too cool or the pot was crowded. Smaller batches, watch the thermometer.
- Soft skin after frying: wings were covered or stacked. Spread on racks, use a low oven hold.
How to serve
- Keep fried wings on racks, uncovered, until you are ready to sauce and serve.
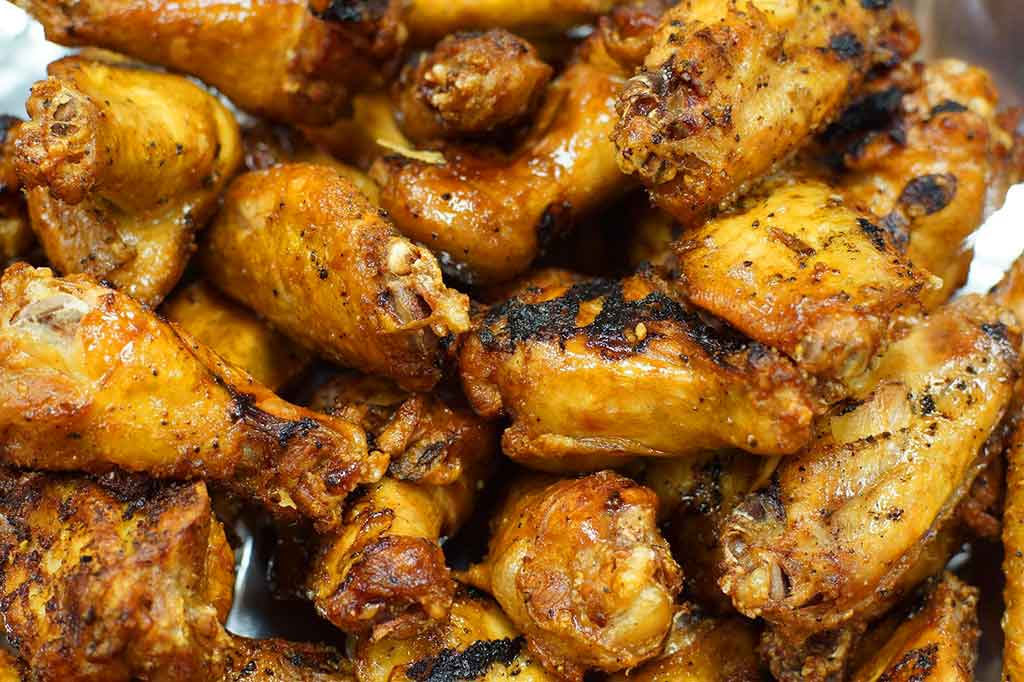
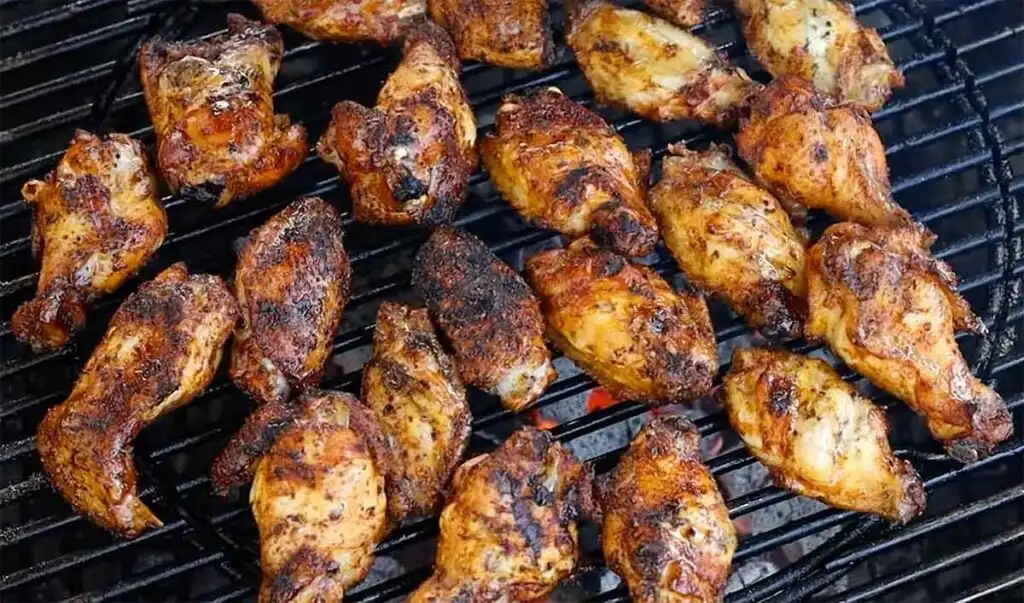
Grill
Method snapshot
- Best for: outdoor parties with grilled flavor
- Crispness: medium to high with a strong finish
- Capacity: medium, limited by grate space
- Hands-on: medium
- Make-ahead: medium
Best use case for a crowd
Outdoor parties where you want grilled flavor and a workable path to crisp skin.

What you need
- Grill set up for two-zone grilling (direct and indirect)
- Tongs
- Instant-read thermometer (recommended)
Capacity reality check
Capacity on a grill depends on grate size and whether you can keep a true two-zone setup. On many home grills, about 20–30 wings is a comfortable “one-round” batch when you can still leave space and rotate. If you are feeding 10–50+, expect batches unless you have a large grill, extra rack space, or a second cooker.
Step-by-step workflow for a crowd
- Set up two zones: one hot direct side, one cooler indirect side.
- Cook indirect first with the lid closed, around 300 to 350°F, for roughly 15 to 20 minutes.
- Finish over direct heat for about 3 to 5 minutes per side to crisp and char.
- Check doneness: confirm the thickest pieces reach at least 165°F. Higher temps can still be juicy on wings.
- Hold on racks in a low oven if you need to finish multiple rounds.
Crispness tips that matter
- Indirect first prevents burnt outside and undercooked inside.
- For better crisp skin, fridge-dry wings uncovered before grilling if you can.
Common failure points and fixes
- Flare-ups: move wings back to indirect, keep lid closed, use two-zone discipline.
- Skin sticks: clean and oil grates.
- Uneven cooking: rotate wings and swap zones because grills have hot spots.
How to serve
- Sauce at the end. For sugary sauces, wait until the final minutes so they do not burn.
- If you are serving in batches, keep finished wings dry and hot, then toss small batches to order.
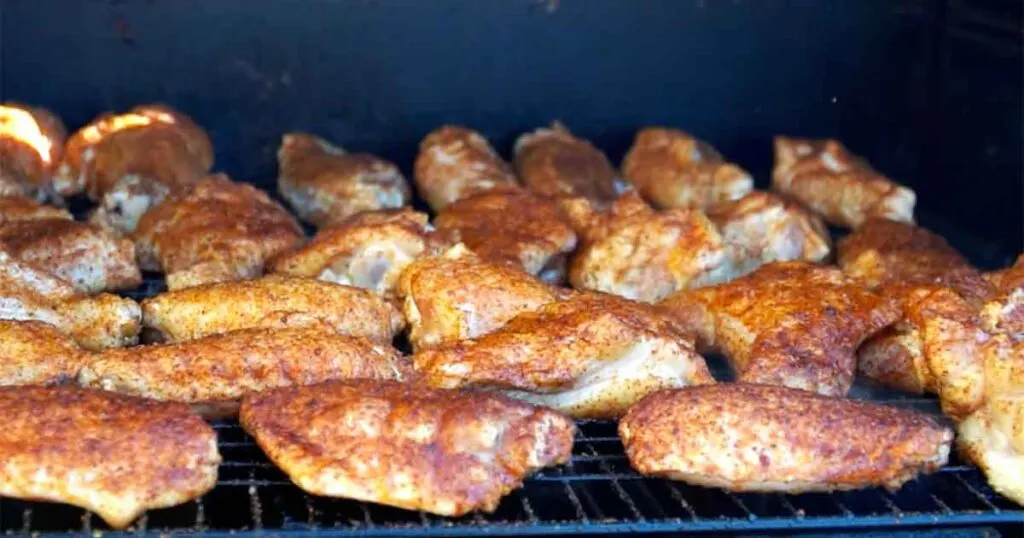
Smoker
Method snapshot
- Best for: smoke flavor and a make-ahead workflow
- Crispness: needs a hot finish for best texture
- Capacity: high if you have racks and airflow
- Hands-on: low to medium
- Make-ahead: excellent
Best use case for a crowd
When you want BBQ smoke flavor and a workflow that can be mostly done ahead, then finished fast.

What you need
- Smoker or pellet grill
- A hot finishing option (high-temp smoker setting, grill, or oven)
- Instant-read thermometer (recommended)
If you are choosing wood for wings, mild smoke usually plays best. Our wood selector helps you match woods to chicken and avoid overpowering smoke. In general, fruitwoods tend to stay lighter and sweeter on wings, while stronger hardwoods can take over if you run heavy smoke.
Capacity reality check
Smokers can handle large quantities, but capacity is limited by rack space and airflow, not the fire. Wings should sit in a single layer with a little space between pieces so smoke and heat can circulate. If you crowd them, you will slow cooking and fight rubbery skin. Plan on a hot finish if crispness matters.
Step-by-step workflow for a crowd
- Season with a dry rub. Pat dry first.
- Smoke at about 225°F until wings have good color and the thickest pieces read roughly 150 to 160°F then move immediately to step 3. (Wings are not done or safe at this point. They only become safe after the hot finish takes them to 165°F+. Do not stop here and “finish later,” even refrigerated. If you need to hold for later, cook to at least 165°F first, then chill and reheat to 165°F+.)
- Finish hot for crisp skin: choose a high-heat finish that you can run in batches:
- High-heat grill (direct heat) for quick crisping
- Hot oven (425–450°F) or broiler for a fast, dry finish
- Air fryer for a crisp finish in small rounds
- Deep fry for the crispiest finish and fast serving batches
- Crank the smoker if it can truly run hot and dry enough to crisp
- Confirm at least 165°F internal after the finish.
- Sauce at the end.
For a full smoked-wings walk-through, see smoked chicken wing recipe.
Make-ahead win
- For true make-ahead, cook wings to a verified 165°F+, cool fast and refrigerate within 2 hours, then reheat with a hot finish right before serving to restore texture and bring them back to 165°F+. This is one of the easiest ways to serve smoked wings at party scale without being tied to the cooker.
Crispness tips that matter
- Low-and-slow alone usually gives rubbery skin. The hot finish is what changes the texture.
- You can take wings higher than 165°F and still have tender meat, especially on the smoker.
Common failure points and fixes
- Rubbery skin: you skipped the hot finish. Fix by finishing at high heat.
- Sauce burns: apply sauce after crisping, or only during the final minute or two of the hot finish.
How to serve
- Finish hot for texture, then sauce at the end or serve sauce on the side.
Air fryer
Method snapshot
- Best for: serving in batches using a familiar appliance
- Crispness: high when you do not crowd the basket
- Capacity: low per round, scales by batches or multiple units
- Hands-on: medium
- Make-ahead: medium
Best use case for a crowd
When the air fryer is your most comfortable tool and you are willing to serve in batches, or you have multiple units.
What you need
- Air fryer (or two)
- Tray and rack setup for holding finished batches
- Instant-read thermometer (recommended)
Capacity reality check

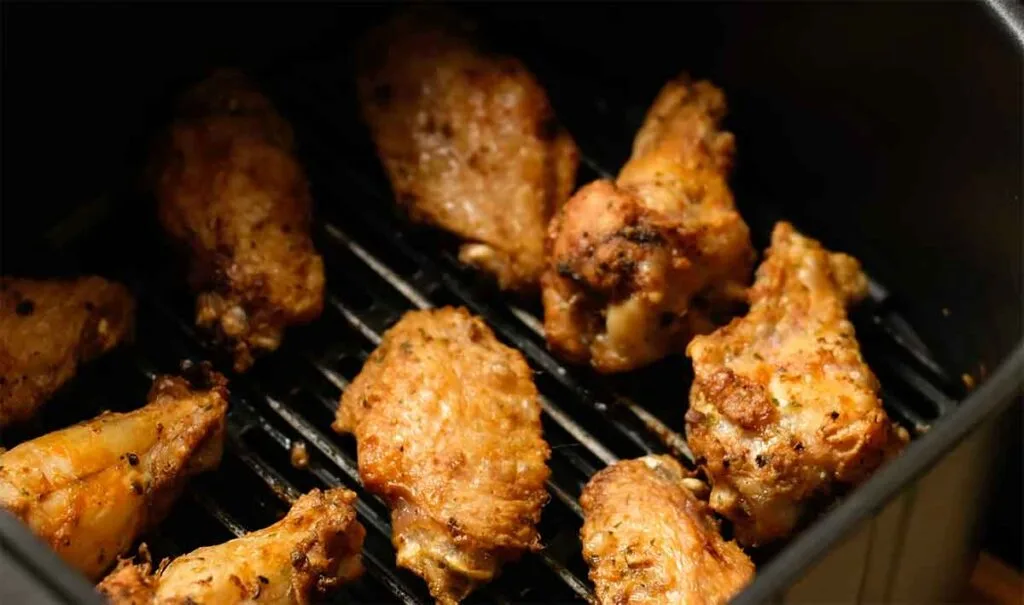
Air fryers make crisp wings, but batch size is small. For 10–50+, the practical approach is rounds with wings in a single layer. If you cram the basket, wings steam and take longer. For 50+ wings, an air fryer works best with multiple units or as a helper alongside an oven, grill, or fryer.
Step-by-step workflow for a crowd
- Dry wings well and season.
- Cook in batches at 380–400°F, flipping/shaking halfway.
- Check doneness: Spot-check a few wings and confirm the thickest part hits at least 165°F before moving them to the holding rack.
- Hold finished wings on a rack in a low oven while you run the next batch, then re-crisp 2–4 minutes at high heat right before serving if needed.
- Sauce to order right before serving.
Crispness tips that matter
- Give the wings space. Air fryers are small convection ovens, so airflow is the point.
- Hold batches uncovered so they do not steam.
Common failure points and fixes
- Soft skin: basket was crowded or wings were sauced early. Spread out and give a short hot finish before serving.
How to serve
Use the same crowd logic as the oven method: dry hold, then sauce to order.
Solving real constraints
If your wings are frozen
- Thaw in the fridge, then pat wings very dry before seasoning.
- If you have time, rack-dry uncovered in the fridge for a few hours to cut surface moisture and help crispness.
- In big batches, wings start colder and can run longer, so keep spacing and airflow as the priority and cook to at least 165°F.
Limited oven space
- Use the oven for what it does best: holding and re-crisping.
- If you are grilling, smoking, or frying, keep finished wings on racks in a 170 to 200°F oven while you complete batches.
- If you are oven-baking and you cannot fit everything at once, run two rounds and hold the first round dry while the second finishes.
Serving in batches without soft wings
- Cook and hold wings unsauced on racks.
- Put out a smaller platter.
- Refill with hot wings as needed.
- Toss only the batch you are serving right now.
Cooking ahead without soggy skin
- Smoke-ahead with a hot finish is one of the best options.
- For baked wings, you can hold briefly in a low oven. For longer holds, transport, and arrival fixes, the holding guide linked in the intro provides the full step-by-step plan.
Traveling with wings
- Avoid sealing hot wings in tight containers.
- Use foil pans with loose coverage so steam can escape.
- If you have access to an oven at the destination, a short hot re-crisp pass can bring the skin back.

Safety and doneness
- Cross-contamination is the main risk with raw wings. Keep raw chicken and its juices away from anything you’ll eat as-is, and wash hands, boards, knives, and counters right after prep. The CDC’s chicken prep steps are a solid checklist.
- Chicken wings are safe at 165°F internal on the thickest piece.
- Wings often eat better at higher internal temps (roughly 175 to 210°F) because more fat renders and connective tissue softens. Many cooks prefer wings hotter for texture and juiciness; see ThermoWorks on higher finish temps for wings.
- For holding, keep food above 140°F and avoid leaving wings at room temperature for extended periods.
- If you’re cooling leftovers: refrigerate within 2 hours (1 hour if very hot room), and reheat leftovers to 165°F.
- Leftovers happen with big batches, so bookmark this guide to reheat wings crispy the next day.
FAQ: Cooking Wings for a Crowd (Planning, Batching, and Holding)
If you’re already sold on a method, these quick FAQs cover the real party problems: planning a simple timeline, running batches, holding wings without steaming, and finishing hot so they hit the platter crisp and safe.
For best texture, cook wings the day of and hold them unsauced on racks in a low oven until service. If you must cook ahead, chill quickly, refrigerate, then finish hot right before serving to reheat and re-crisp to 165°F+. This works especially well for smoked wings with a planned hot finish.
Work backward from serving time. Plan your last hot finish to end 5–10 minutes before you want wings on the table, then sauce to order. Add buffer time for batches (often the real bottleneck). If using the oven, schedule rounds by sheet-pan capacity, and use a rack hold so early batches stay hot without steaming.
If you’re cooking ahead, cook wings to 165°F+ first, then you can finish later. The simplest make-ahead approach is to cook wings to 165°F+ in the thickest pieces, cool and refrigerate, then reheat with a hot finish to re-crisp and confirm 165°F+ again before serving. Avoid refrigerating wings that are only partially cooked. If you’re staging during the same cook window (not overnight), hold fully cooked wings hot on racks in a low oven, then do your final hot finish right before the platter.
Use a dry rack hold and keep air moving. Transfer finished wings to racks in a 170–200°F oven, uncovered, while the next batch cooks. Keep wings unsauced until the moment they hit the platter. If texture drops, do a quick hot re-crisp pass, then sauce the batch you’re serving right now.
Pick one unit as the production cooker and the other as the holding/finishing station. A common win is grill, smoker, or fryer for output, with the oven reserved for rack holding and quick re-crisping. The key is avoiding covered pans and stacked wings, which trap steam and undo crispness.
If crispness matters, treat sauce like the last step. Toss only the batch you’re serving immediately, and keep the rest dry on racks. For long parties, many hosts do a mix: one platter tossed to start, plus sauces for dipping, then toss-to-order as refills happen. This keeps texture consistent across rounds.
Corrections and editorial standards
- Spotted something wrong or outdated? Send a correction here: Corrections & Updates
- How we handle sources, testing, and updates: Editorial Standards
- Media or general notes: Email the publisher
Restaurant owners and authorized reps should use the listing update form: Restaurant Listing Update.
Sources
- FoodSafety.gov: Safe Minimum Internal Temperatures (poultry at 165°F, plus reheating guidance)
- FoodSafety.gov: 4 Steps to Food Safety (core handling reminders, danger zone basics, and hot-holding concepts)
- CDC: Chicken preparation steps (cross-contamination prevention checklist)
- Serious Eats (J. Kenji López-Alt): Oven-Fried Buffalo Wings (baking powder method and two-stage oven approach)
- ThermoWorks: Wings and higher finish temperatures (why wings often eat better above 165°F)
- USDA FSIS: Deep Fat Frying (deep-frying safety considerations)
We cite authoritative references and note when testing is based on firsthand experience.
About the author
James Roller documents South Carolina barbecue for Destination BBQ and authored the SC BBQ cookbook Going Whole Hog. He researches techniques, interviews pitmasters, and he and his wife, Heather, have cooked and served wings for home gatherings for years, focusing on practical, low-stress ways to keep food hot, safe, and worth eating.